Have you captured an exceptional video in which the background is filled with abrupt noises? These noises may cause your viewers to lose focus and be unable to concentrate on the video’s content. What steps should you take if you find yourself in this situation? To help you remove audio from video, we’ve got a simple trick. Therefore, you have the option of uploading your remarkable videos to your social media platforms or sharing them with your acquaintances. Regardless of whether you are operating on a Windows PC or a smartphone, you require the appropriate software or app for your mobile device. You can resolve the issue across all platforms using software such as Movavi, VLC, etc.
How Do You Remove Audio From A Video?
Before publishing any video on any channel or platform, regardless of the subject matter, you must always make sure that there is no background disturbance. If your video’s background audio is incompatible or you don’t want annoying video sounds, muffle it. Frequently, the audio recording that accompanies videos is either excessively noisy or captures a sound that was not at all necessary for the video. In a similar vein, there are numerous occasions in which it is necessary to completely remove the audio component. We have elaborated on the steps to make the process of extracting audio from a video using Movavi Video Editor easier. In order to facilitate comprehension, we have partitioned our article into three sections.
- On Windows, remove audio from videos.
- On Android, remove audio from videos.
- On iOS, remove audio from videos.
On Windows, Remove Audio From A Video
If you have ever recorded audio or video, you may have encountered the issue of unpleasant background noise. The final footage, whether it is a family video or an interview, contains a variety of sounds, including respiration and incidental conversation. You need a solution, and fortunately, we have one for you, to remove these background noises from your outstanding videos.
To replace or extract audio from videos, try Movavi Video Editor. To optimize your video recordings, launch this video editing software on Windows. It is an effective video editing software that is compatible with both Windows and Mac. Using Movavi Video Editor, you can extract, replace, or remove audio from the videos to present them in the manner that you desire. Using Movavi Video Editor, removing audio from an existing video is effortless. Here are the steps to use Movavi Video Editor on Windows.
- Install Movavi Video Editor and adhere to the installation instructions.
- To begin the editing process, upload the media files. To achieve this, select “Create New Project” and then “Add Media Files.” Choose the video that you wish to edit.
- To remove audio from a video, double-click on the timeline and select Audio in the Tools menu. This time, locate the Noise Removal button.
- Noise suppression is an option that is available under Noise Removal. Please adjust the slider to your specifications and click.
This will assist you in eliminating undesired sounds from your recorded content. Experiment with various variables until you achieve the most favorable outcomes.
Export the file once you have achieved the finest outcome. Click Export and choose a format to save the footage. To export the final file, click the “Start” button after selecting the video or audio format.
On Android, Remove Audio From Videos
Well, on Android, removing sound from videos is as easy as removing it from Windows. On your Android device, download the Android version of Movavi Video Editor, also known as Movavi Clips. Follow these simple steps to remove the audio from the video. Here are the guidelines for using the Movavi Clips Android app.
- You can get Movavi clips from the Google Play Store.
- To access the app, click the Plus (+) icon located at the bottom.
- To select the video you want to edit, choose “Video.”
- To commence, select the aspect ratio and tap “Start editing.”
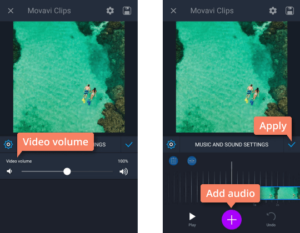
- To remove audio from a video, tap the Audio button in the bottom left corner.
- Tap the cogwheel to move the video volume slider to the left. On Android, set the volume to zero to remove audio from videos.
- Tap the Plus button, select the audio file you want, and then click Add. Once you have completed the task, select the “Check Mark” icon.
- Right now To save the resulting video, select Save in the top-right corner. This will provide you with a preview. Save the final outcome by tapping Save once more.
On iOS, Remove Audio From Videos
To remove sound from videos on iOS, follow the same steps as for the Movavi Clips App for Android. To install Movavi Clips on your iOS device, navigate to the App Store and search for the app. Below is the detailed procedure for removing audio from a video using Movavi Clips for iOS. Here are the guidelines to use the Movavi Clips iOS app.
- You can get Movavi Clips from the App Store.
- To access the app, click the Plus (+) icon located at the bottom.
- Select the video that you wish to edit.
- To initiate the editing process, select “Start Editing.”
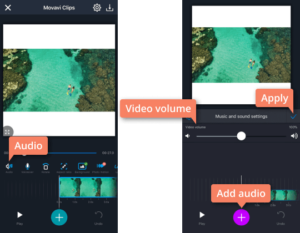
- To remove audio from a video, tap the Audio button in the bottom-left corner.
- Now, move the Video Volume slider to the left. To remove audio from video on iOS, set the slider to 0%.
- To add audio to the video, press the Plus button, select a new audio file, and then tap Add. Once you have completed the task, select the “Check Mark” icon.
- Save the resulting video now by selecting Save in the top right corner of the app.
Why Might You Need To Remove Audio From A Video?
No detail is too minor when producing captivating videos. Frequently, a video’s audio may appear to be off-track, and background commotion can easily undermine your diligent efforts. The following is a rationale for thinking about removing sound from a video:
To Add A Different Audio
The most popular justification for choosing to remove audio from a video is to add new audio entirely. For example, it could be a background score, recorded vocals (such as a narration), or a sound or piece of music that is more conducive to the video’s overall atmosphere.
To Eliminate Unwanted Noise
While editing your video, you might notice some commotion or rumbling that requires cleanup. This could be as straightforward as a car alarm or as impromptu as an off-camera sneeze. You can rapidly replace the undesirable components of your audio or the entire recording with a clearer version by learning how to remove sound from audio video.
To Improve The Sound Quality
A well-produced video is only one aspect of video creation. Additionally, top-notch audio is necessary. Consider isolating the sound from the video and replacing it with higher-quality audio if the quality is subpar.
To maximize the impact of the video’s storytelling, you can replace the sound or remove a subsection to augment the original sound with more impactful audio. This will guide the viewers through a different story than what the video represents.
Consider The Following:
- Karaoke Software
- Safe Browsers
- Tower Defense Games
- Unblocked Games
- Android Apps to Stream Live Sports
Final Words:
In summary, Movavi Video Editor, or Movavi Clips, is video editing software that enables users to produce exceptional videos. Use this editor on your mobile device or Windows to achieve optimal outcomes. For improved results, you can also add or remove audio, transitions, and effects to the video based on your choice. In this article, we have provided a comprehensive guide on how to use the Movavi Video Editor on Windows and the Movavi Clips App on Android and iOS. Do you find it enjoyable to read? We would be delighted to receive your feedback. Please share your thoughts in the comments section below.


