Windows desktops and laptops come preinstalled with Microsoft’s antivirus software, Windows Defender, to safeguard them against malware attacks and other security threats. Your system currently activates Defender by default. In order to guarantee continuous cybersecurity threat protection, it is imperative that you maintain it. Despite Windows Defender’s widespread reputation as one of the best computer security software for Windows 11/10 PCs, there may be situations where you wish to temporarily or permanently disable Windows Defender.
Why Do You Need To Disable Windows Defender Antivirus On Windows 11/10?
For instance, Windows Defender might flag one of your crucial files as dangerous, preventing you from accessing it during a project. Furthermore, it may result in compatibility issues with other software, which can lead to program crashes or malfunctions. Windows Defender frequently consumes system resources and impedes all operations due to its continuous surveillance and resource-intensive operations.
It is possible that you have privacy concerns regarding the data that Windows Defender collects. In each case, it appears to be a reasonable solution to maintain productivity while maintaining security by temporarily halting or disabling the Microsoft Defender feature. This article will guide you through a variety of methods to achieve this. Therefore, let us commence!
How To Disable Windows Defender On Windows 11/10?
You can use these three methods to disable Windows Defender.
Using Group Policy Editor
If you have Windows 10 Pro and Enterprise, you can use Local Group Policy to disable Windows Defender. To accomplish this, follow the steps below.
- To launch Group Policy Editor, press Windows and R to open a Run box, and then enter gpedit.msc after that.
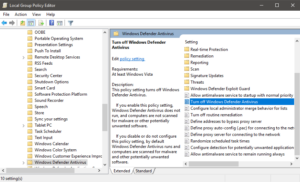
- Navigate to Computer Configuration > Administrative Templates > Windows Components > Windows Defender Antivirus.
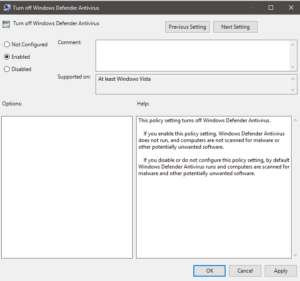
- Locate and turn off Windows Defender antivirus.
- To complete the process, click the radio button on the right side of the new window that appears.
- Select “Apply” and then “OK.”
This will permanently disable the feature, unless you modify it.
Using Windows Registry
Use Registry Editor to disable Windows Defender. It is imperative that you create a backup of the Registry Editor prior to proceeding, as a single error could result in the device malfunctioning.
Steps To Take A Backup Of Windows Registry
- Press the Windows and R keys; type “regedit”; and press the enter key.
- Navigate to File->Export in Registry Editor.
- A window will appear, allowing you to save the registry file backup to your preferred location.
To disable Windows Defender with Registry Editor, follow the steps below after you have taken a backup.
- To type “regedit” in the “Run” window, press the Windows and R keys.
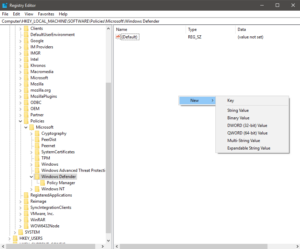
- Navigate to HKEY_LOCAL_MACHINE->Software->Policies->Microsoft->Windows Defender.
- On the right side of the panel, look for Default.
- To select the New->DWORD(32-bit) value, right-click on the right side of the window.
- Name the key “Disable AntiSpyware” and press the Enter key.
- After generating the file, double-click it and set the value to 1.
- To approve and restart your computer, click “OK.”
This method allows you to disable Windows Defender on your desktop. Being a native Windows app, this will disable but not remove the app.
Using Third-Party Antivirus
If false alarms are your sole motivation for disabling Windows Defender, it’s wise to switch to a superior alternative. Installing third-party antivirus software automatically disables Windows Defender, leaving only the new security program operating on your system.
Also, Take A Look At:
Conclusion:
So, these are the simple ways to disable Windows Defender on your Windows 11/10 PC. The easiest method is to use the Windows Security app. One may wish to permanently disable Windows Defender using the Registry Editor or Group Policy Editor.


