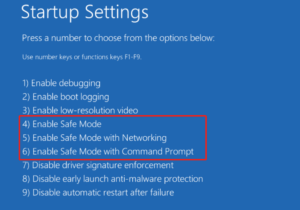
Let’s be honest, experiencing a computer malfunction is usually anything but enjoyable. Watching a black screen, frantically pressing F8 (rest in peace), and entering the stark environment of Safe Mode can be unsettling, even for the most skilled tech users. Amongst the frustration, there’s often an urgent need: to secure your important files. Fear not, brave data guardians; this guide is here to assist you! Safe Mode is a diagnostic feature in Windows that boots your computer using only essential drivers and services. It helps troubleshoot various issues, including file transfer problems. This article will explain how to transfer files while in Safe Mode on Windows 11/10/8.
How To Transfer Files In Safe Mode?
Safe Mode is like a first-aid kit for your computer. It reduces Windows to its fundamental components, activating only the essential functions. This is important when your system is malfunctioning, as it reduces the likelihood of software conflicts that could complicate your data recovery efforts. While utilizing a system backup image is a wise approach that can avoid the need to reinstall the Windows operating system, a significant concern comes into play when important files are located on your desktop. Choosing to perform a system recovery may pose a considerable risk, as there is a possibility of losing data during the procedure.
To protect against possible data loss during system restoration, it is recommended to proactively move files while in safe mode. Essentially, this allows you to safely transfer your files to an external hard drive if the system fails to boot. This precaution helps ensure that your important data is preserved, even when performing recovery procedures.
Use WBadmin Commands
For those of you who are tech-savvy, Safe Mode includes a valuable feature: the WBadmin command-line utility. This robust tool allows you to back up your data with straightforward commands, even within the restricted environment of Safe Mode.
- Start your computer by powering it on, then consistently tap the F8 key.
- This will lead you to the Advanced Boot Options. Use the arrow keys to select Safe Mode with Command Prompt.
- Launch the Command Prompt by typing “cmd” in the search bar, then right-click it and select “Run as Administrator.”
- In the command prompt, enter the following command precisely and hit the Enter key. Wbadmin start backup -backuptarget:F:-include:C:
F refers to the destination drive where you will copy or upload the data, folder, or drive, while C is the folder or drive that you are backing up. The system will then prompt you for confirmation after showing the details of the operation. To initiate the backup process in Safe Mode, simply type Y.
After the process is finished, your data will be securely stored in the designated folder. You can now leave Safe Mode and address the underlying problem with confidence.
Transfer Data From One Computer To Another Using The Copy-and-paste Technique
- Connect your reliable external hard drive, USB flash drive, or network-attached storage (NAS) device. Make sure to select a destination that you fully trust!
- Go to the folder where your important files are stored. Keep in mind that Safe Mode may have a different appearance, but don’t worry, your files are still accessible!
- Select the files you want to move. If you’re feeling adventurous, press Ctrl or Shift for multiple selections, or go all out with Ctrl+A to select everything.
- Harness the potential of the right-click! Select “Copy” and see those files transfer to your digital clipboard.
- Go to the device where you want to transfer your data (like an external drive or NAS), open a folder, and right-click. This time, select “Paste” to see your data successfully arrive in its new location.
What Is Safe Mode?
Safe Mode can refer to different concepts based on the context. Generally, its purpose across various applications is to offer a simplified and restricted functionality that emphasizes stability and problem-solving rather than complete features. Here are a few specific instances.
In Computer Operating Systems
Diagnostics & Repair – Safe Mode initiates only the necessary drivers and services required for the system to operate, avoiding any potentially troublesome drivers or software that could interfere with normal functioning. This enables users to identify problems, eliminate malware, or uninstall troublesome applications.
Software Removal – When software becomes corrupted or problematic, uninstalling it in regular mode can be challenging. Safe Mode streamlines this process by restricting the programs that can operate, which helps to identify and eliminate the troublesome application more easily.
System Recovery – When an operating system is significantly damaged or fails to start properly, Safe Mode provides access to essential functions and recovery tools. This allows users to try to fix issues or back up data before proceeding with a complete reinstallation.
In Software Applications
Troubleshooting – Some applications provide a Safe Mode that turns off specific features or plugins, making it easier to diagnose crashes or compatibility problems. This allows users to pinpoint the issue while still being able to carry out essential functions in the application.
Core Features – In certain situations, an application’s Safe Mode emphasizes delivering only the fundamental functions, reducing resource consumption, and maintaining stable performance, particularly on older or less powerful devices.
Also, Take A Look At:
- Hand Creams
- Inventory Management Software
- Croxyproxy YouTube
- Skyrim Console Commands
- Webcam Software
Conclusion:
The next time your computer acts up and you have to enter Safe Mode, keep in mind that you have the ability to take control. Armed with these Transfer Files In Safe Mode techniques, moving your important files becomes easy, allowing you to tackle any tech issue with confidence. So, unleash your inner data warrior, choose your preferred method (whether it’s copy-paste or command line), and set out on your triumphant journey to transfer files.


